
Professional photographers can receive images directly from Canon, Sony, and Nikon cameras via FTP during photo shoots. Built-in FTP server runs in app sandbox with no external dependencies.
Demo Video
Click to view in fullscreen
Screenshots
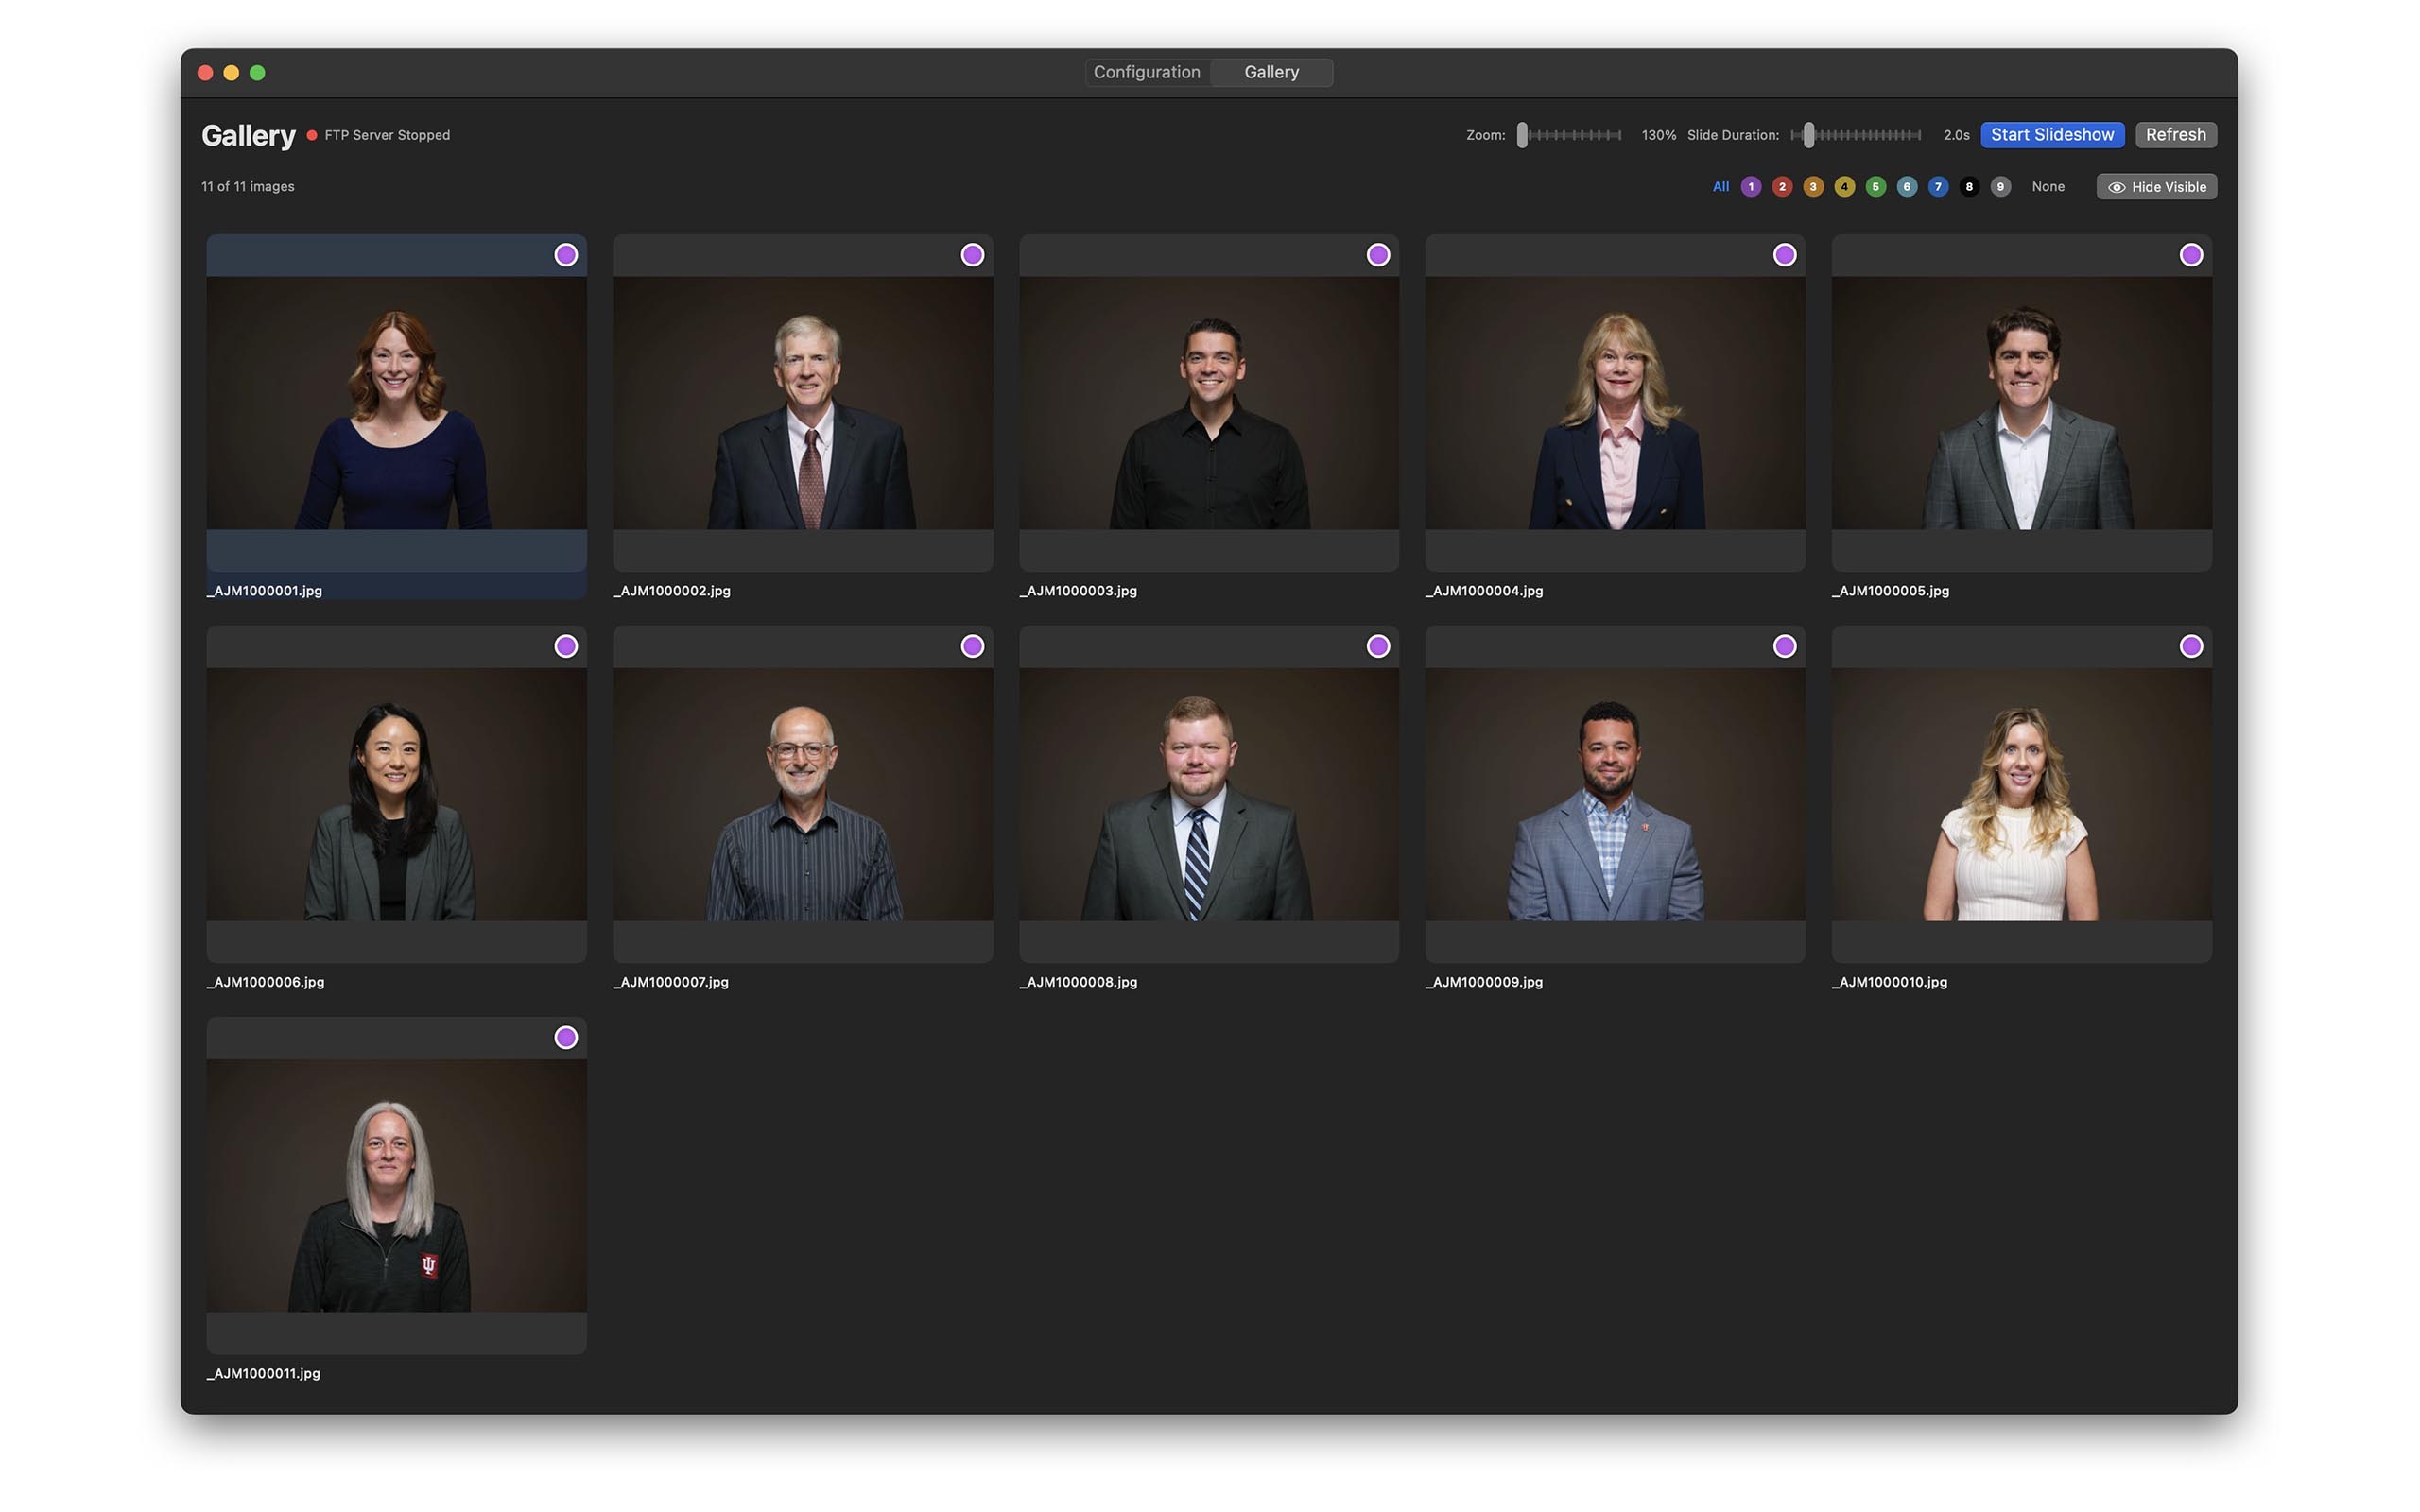
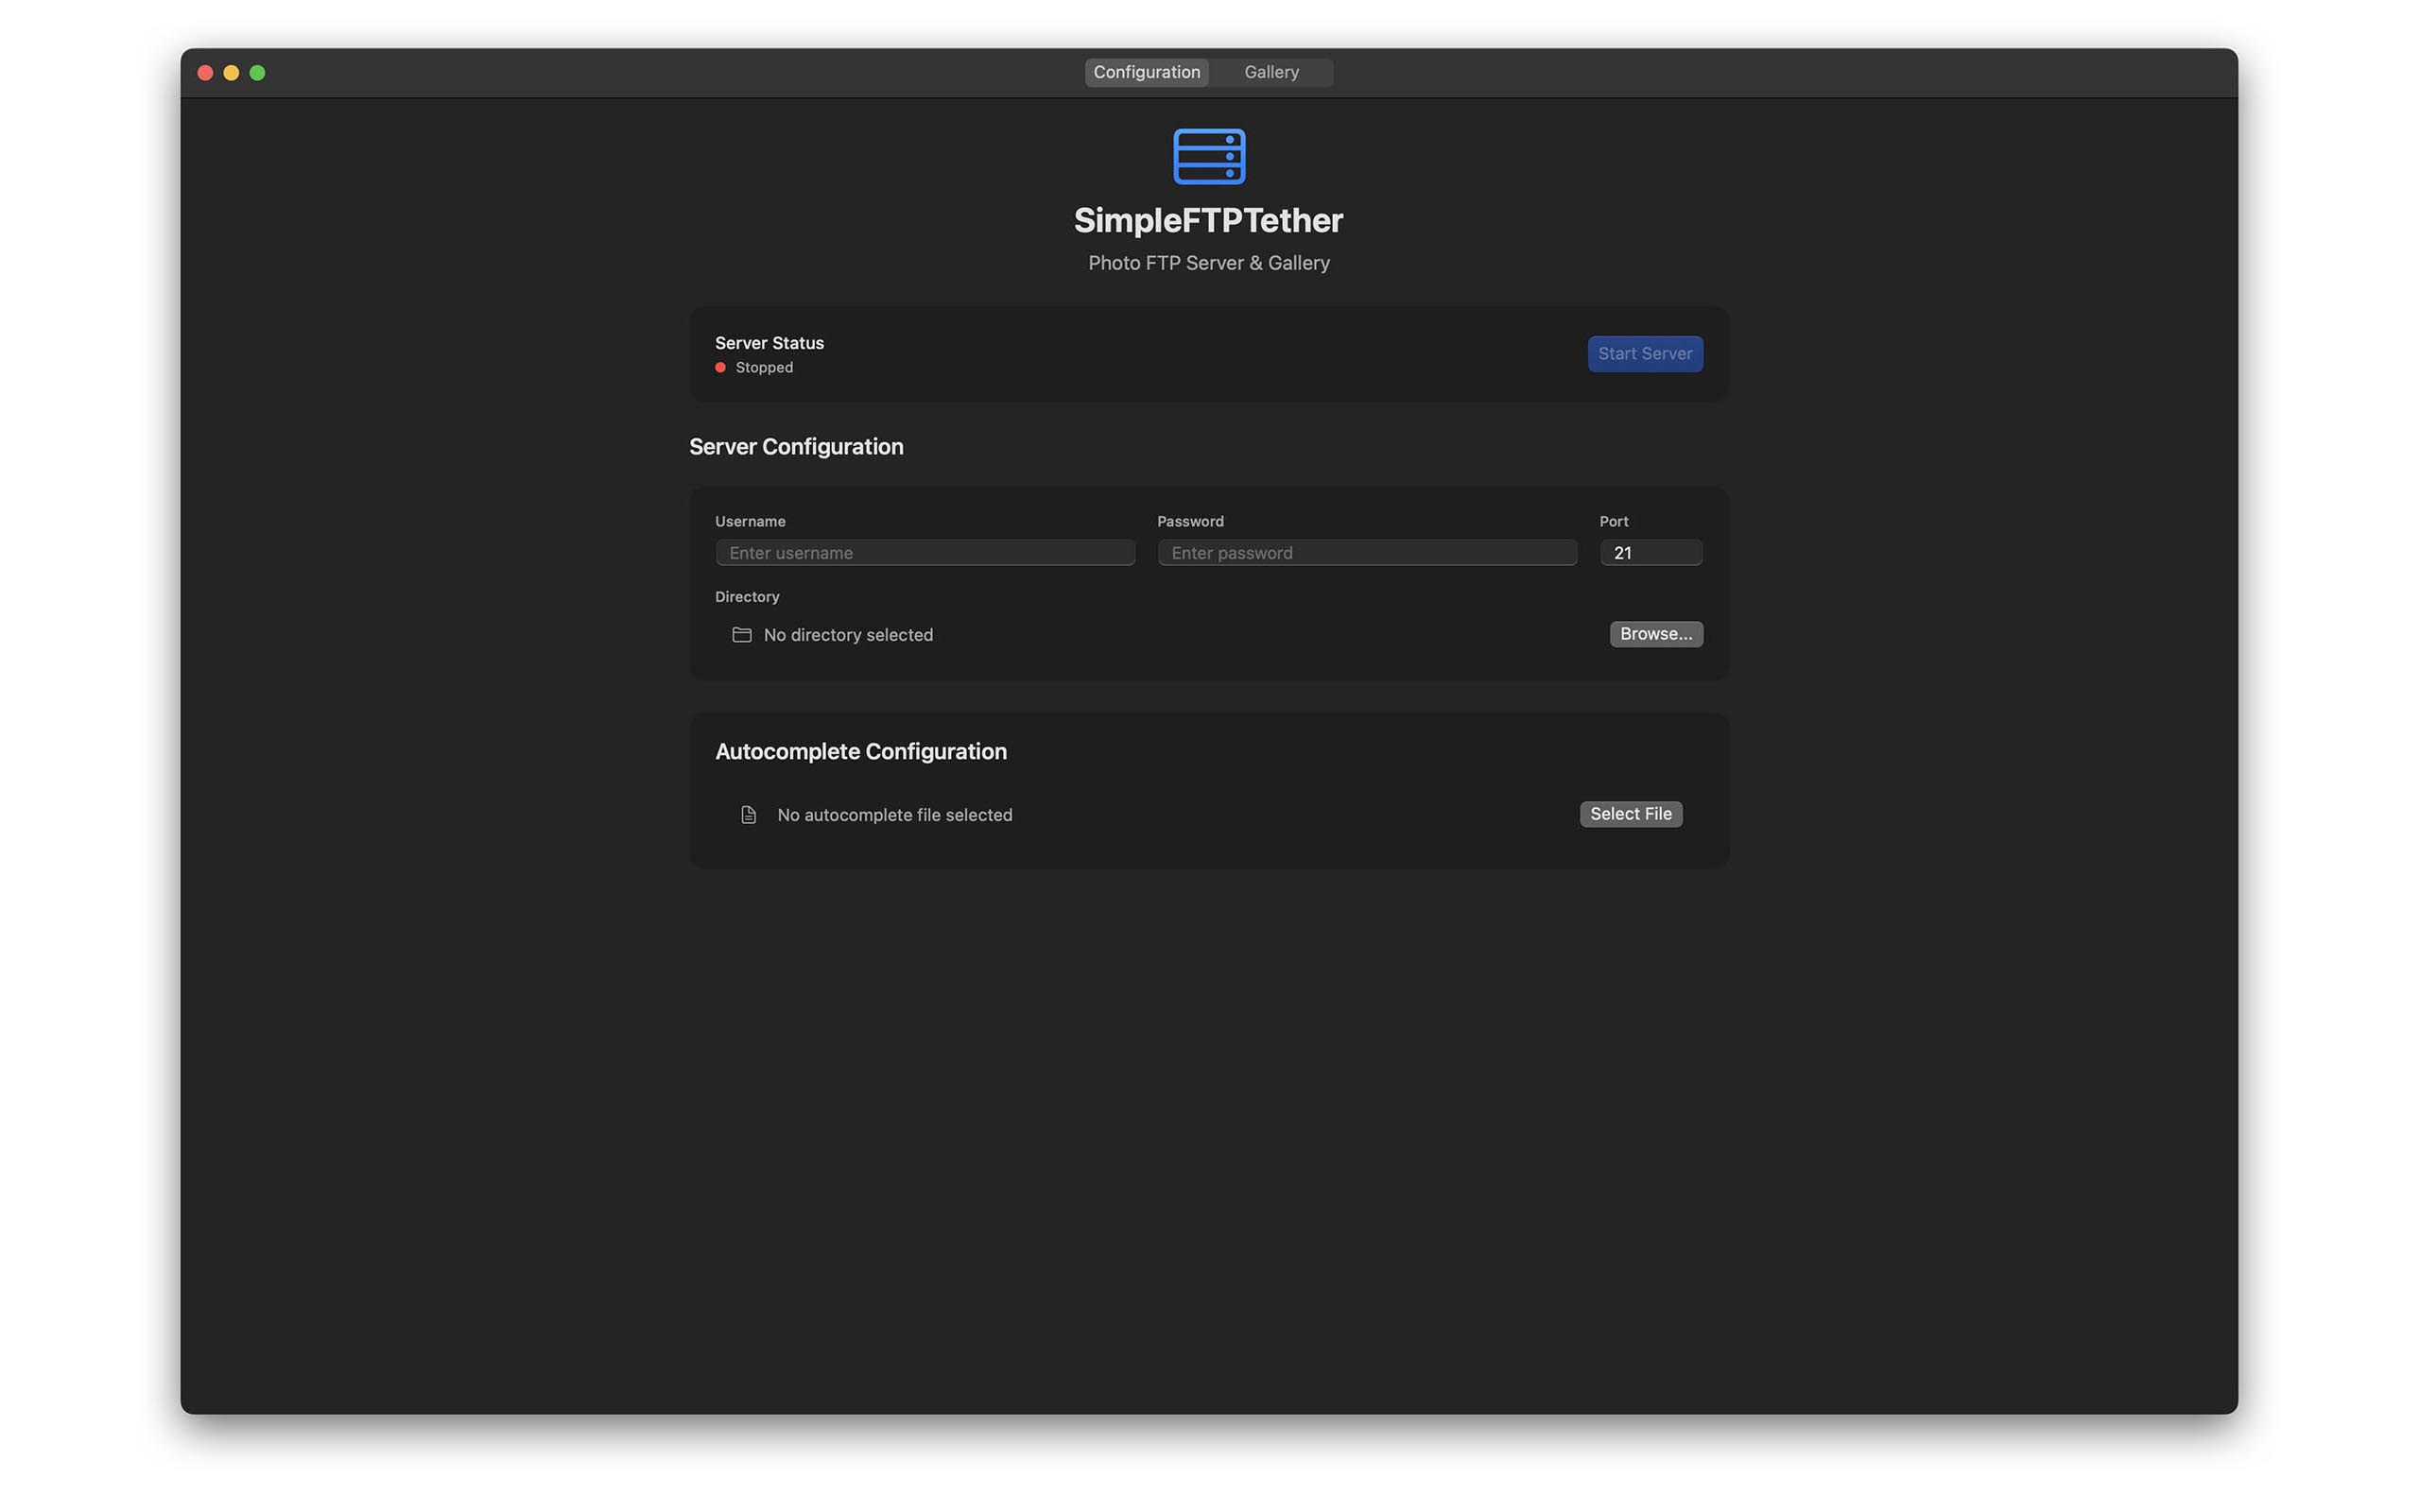
Features
📸 Gallery & Image Management
- Real-time image display as camera transfers files
- Thumbnail generation with lazy loading
- Fast EXIF metadata extraction (ExifTool)
- 2:3 aspect ratio grid with adjustable item sizes
- Persistent ratings and color labels across sessions
- Smart filtering by rating, color, date
- Multiple sort options (date, rating, filename)
- PhotoMechanic-style color codes (0-9) with automatic star rating conversion
- Temporarily hide reviewed images
🖥️ FTP Server
- Self-contained FTP server (SwiftNIO-based)
- Automatic network interface detection
- Username/password authentication
- Standard (21) and custom port support (1024-65535)
- Passive mode for camera compatibility
- Real-time directory monitoring
- Server control with status indication
🔔 Real-Time Notifications
- Camera connection detection with IP tracking
- Multiple camera support
- Automatic gallery refresh
📝 Metadata Management
- Automatic extraction of color codes, descriptions, and person information from XMP/IPTC
- Inline editing with intelligent autocomplete
- Smart context-aware suggestions
- Import support for personalized vocabularies
🎯 Professional Workflow
- Star ratings (1-5 stars) with keyboard shortcuts
- Color labeling system (red, yellow, green, blue, purple)
- Slideshow mode with configurable timing (1-10 seconds)
- Fullscreen slideshow mode (hide controls with 'f' key)
- Image zoom and pan for focus/detail inspection
- Click-and-drag panning (mouse and trackpad)
- Multi-level zoom (1x, 1.5x, 2x, 3x, 4x)
- Keyboard navigation for rapid review
- Non-destructive metadata editing
- Smart arrow key navigation
- Integrated image details (press 'i')
- Real-time color coding with number keys
- Play/Pause control with spacebar
System Requirements
- macOS: 14.0 or later
- Architecture: Apple Silicon only
- Memory: 4GB RAM minimum, 8GB recommended
- Storage: 100MB for app, additional space for image database
Privacy & Security
No Data Collection: We do not collect or transmit any personal data.
Sandboxed Execution: App runs in a secure sandbox environment.
Required Permissions: Only Network (FTP) and Files (user-selected directory) access.
All Data Stays Local: Everything remains on your Mac - no cloud syncing or external transmission.
Network Access: FTP server runs locally on your device. No external data transmission occurs.
File Access: Only user-selected folders are accessed. All files remain on your device.
Trial System: Trial information is stored locally on your device using UserDefaults. This information is not transmitted or shared.
Download & Install
Step 1: Download
Download Simple FTP Tether from the Mac App Store
Open App StoreStep 2: Install
Click "Get" or the price button to download and install the app. The installation will complete automatically.
Step 3: Launch
Find Simple FTP Tether in your Applications folder or Launchpad and launch the app. Your 3-day free trial begins automatically.
Step 4: Grant Permissions
When prompted, grant the app permission to access your selected folders. This is required for the FTP server and image gallery features.
Free Trial
Simple FTP Tether includes a 3-day free trial with full access to all features. After the trial period, unlock lifetime access with a one-time purchase.
The trial banner in the app shows your remaining trial time. You can purchase at any time during or after the trial.
Initial Setup
⚙️ 1. Configure FTP Server
- Go to the FTP Settings tab
- Set a username and password for FTP access
- Choose a port number (default: 21, or use a custom port 1024-65535)
- Select a local directory for image storage using the folder picker
2. Start the FTP Server
Click the "Start Server" button in the FTP Settings tab. The server status indicator will turn green when running.
3. Connect Your Camera or Device
Configure your camera or device to connect to the FTP server using:
- Server Address: Your Mac's IP address (displayed in the app)
- Port: The port you configured
- Username: The username you set
- Password: The password you set
4. Import Autocomplete Data (Optional)
For better metadata editing, import a text file with names and keywords. The file should contain one entry per line in plain text format (UTF-8).
Using the Gallery
- Color Code: Click on an image to open details, use number keys 0-9
- Filter: Use the color filter dropdown to show specific color codes
- Hide Reviewed: Temporarily hide images you've already reviewed
- Grid Size: Adjust the size of grid items with the slider
- Slideshow: Click "Start Slideshow" or hover over an image and click play
Slideshow Controls
- Arrow Keys: Navigate between images
- Number Keys (0-9): Assign color codes
- Spacebar: Pause/resume automatic advancement
- i Key: Toggle image details panel
- = Key: Zoom in
- - Key: Zoom out
- z Key: Reset zoom to fit screen
- ESC: Exit slideshow and return to gallery
📷 How to Configure Your Camera for FTP
⚠️ IMPORTANT DISCLAIMER
This is a general guide based on current camera firmware versions. Camera firmware updates may render parts of this guide incorrect or outdated. Menu locations, option names, and procedures may change with firmware updates.
For the most up-to-date and accurate instructions for your specific camera model, please refer to:
- Your camera's official user manual
- Your camera manufacturer's official support website
- Your camera's latest firmware release notes
Select your camera brand below for detailed setup instructions to connect your camera to Simple FTP Tether.
Canon Camera FTP Setup
Supported Canon Models with FTP
EOS R Series (Mirrorless):
- EOS R1 - FTP/FTPS/SFTP - Manual
- EOS R3 - FTP/FTPS/SFTP - Manual
- EOS R5 Mark II - FTP/FTPS/SFTP - Manual
- EOS R5 - FTP/FTPS/SFTP - Manual
- EOS R5 C - FTP/FTPS - Support
- EOS R6 Mark II - FTP/FTPS/SFTP - Manual
- EOS R6 - FTP/FTPS/SFTP - Manual
- EOS R8 - No FTP Support
- EOS R / EOS RP - No Native FTP Support
EOS DSLR Series:
- EOS-1D X Mark III - FTP/FTPS - Manual
- EOS 5D Mark IV - FTP/FTPS (requires WFT-E7 transmitter)
- EOS 7D Mark II - FTP (requires WFT-E7 transmitter)
Before You Begin
- Update your camera to the latest firmware from Canon Support
- Start Simple FTP Tether on your Mac and click "Start Server"
- Note the IP address, username, and password from the FTP Settings tab
- Ensure camera and Mac are on the same Wi-Fi network
General Setup Steps
Step 1: Enable Wi-Fi
Navigate to: MENU → Communication settings → Wi-Fi/Bluetooth connection → Wi-Fi function → Enable
- Select your Wi-Fi network from the list
- Enter your Wi-Fi password
- Wait for "Connected" confirmation
Step 2: Configure FTP Server
Navigate to: MENU → Communication settings → Wi-Fi/Bluetooth connection → Connect to FTP server
- Select "Register new destination"
- Server address: Enter IP from Simple FTP Tether (e.g., 192.168.1.100)
- Port number: 2121 (or port shown in Simple FTP Tether)
- Passive mode: Enable (CRITICAL!)
- User name: From Simple FTP Tether
- Password: From Simple FTP Tether
- Destination folder: / (root folder)
Step 3: Enable Auto Transfer (Recommended)
- Connect to your saved FTP server profile
- Enable "Auto transfer" for automatic uploads after each shot
- Select transfer size (JPEG, RAW, or RAW+JPEG)
- Alternatively, manually select and transfer images from playback mode
⚠️ Important Notes:
- Always enable Passive Mode to prevent "Error 41: Cannot connect" issues
- For FTPS/SFTP cameras: Select "FTP" (not FTPS/SFTP) in camera settings
- Enabling Auto Transfer ensures images upload immediately after capture
For detailed camera-specific instructions, click your camera model's manual link above.
Sony Camera FTP Setup
Supported Sony Models with FTP
Alpha Series (Mirrorless):
- Sony A1 II (ILCE-1M2) - FTP Guide
- Sony A1 (ILCE-1) - FTP Guide
- Sony A9 III (ILCE-9M3) - FTP Guide
- Sony A9 II (ILCE-9M2) - FTP Guide
- Sony A9 (ILCE-9) - FTP Guide
- Sony A7R V (ILCE-7RM5) - FTP Guide
- Sony A7R IV (ILCE-7RM4) - Requires Firmware 1.20+ - FTP Guide
- Sony A7R III (ILCE-7RM3) - FTP Guide
- Sony A7 IV (ILCE-7M4) - FTP Guide
- Sony A7 III (ILCE-7M3) - Requires Firmware 4.00+ - FTP Guide
- Sony A7S III (ILCE-7SM3) - FTP Guide
- Sony A7C II (ILCE-7CM2) - Help Guide
- Sony A7C (ILCE-7C) - FTP Guide
Cinema Line:
Not Supported: A7 (original), A7 II, A6000 series, A6100, A6400, ZV-E10
Before You Begin
- Update your camera to the latest firmware from Sony Support
- A7R IV requires firmware 1.20+, A7 III requires firmware 4.00+
- Start Simple FTP Tether on your Mac and click "Start Server"
- Note the IP address, username, and password from the FTP Settings tab
- Ensure camera and Mac are on the same Wi-Fi network
General Setup Steps
Step 1: Enable Wi-Fi
Navigate to: MENU → Network → Wi-Fi → On
Then: MENU → Network → Wi-Fi Settings → Access Point Set. → Manual Set.
- Select your Wi-Fi network from the scan results
- Enter your Wi-Fi password using the on-screen keyboard
- Wait for "Connected" confirmation
Step 2: Enable FTP Function
Navigate to: MENU → Network → Transfer/Remote → FTP Transfer Func. → FTP Function → On
Step 3: Configure Server Settings
Navigate to: MENU → Network → Transfer/Remote → FTP Transfer Func. → Server Setting → Server 1
- Display Name: SimpleFTPTether (or any name)
- Host Name: Enter IP from Simple FTP Tether (e.g., 192.168.1.100)
- Port: 2121 (or port shown in Simple FTP Tether)
- User Name: From Simple FTP Tether
- Password: From Simple FTP Tether
- Destination Folder: / (root folder)
- Passive Mode: On
Step 4: Test Connection & Enable Auto Transfer (Recommended)
- Select "Test Connection" to verify settings
- Set "Transfer Target" to Still Image (JPEG fastest) or RAW+JPEG (full backup)
- Enable "Auto FTP Transfer" for automatic uploads after each shot
⚠️ Important Notes:
- Always enable Passive Mode in camera settings
- Enabling Auto FTP Transfer ensures images upload immediately after capture
- Camera and Mac must be on the same Wi-Fi network
For detailed camera-specific instructions, click your camera model's FTP Guide link above.
Nikon Camera FTP Setup
Supported Nikon Models with FTP
Z-Series Mirrorless (Built-in Wireless):
- Nikon Z9 - FTP/FTPS/SFTP - Manual
- Nikon Z8 - FTP/FTPS/SFTP - Manual
- Nikon Z6 III - FTP/FTPS - Manual
- Nikon Zf - FTP - Reference Guide
D-Series DSLR (Requires Wireless Transmitter):
- Nikon D6 - Requires WT-6 - Manual
- Nikon D5 - Requires WT-6 - Manual
- Nikon D850 - Requires WT-7 - Manual
- Nikon D810 - Requires WT-5 - Downloads
- Nikon D800/D800E - Requires WT-5 - Downloads
- Nikon D780 - Requires WT-7 - Manual
- Nikon D500 - Requires WT-7 - Downloads
- Nikon D4S - Requires WT-5 - Downloads
- Nikon D4 - Requires WT-5 - Downloads
Not Supported: Consumer Z-series (Z5, Z6, Z6 II, Z7, Z7 II, Z30, Z50, Zfc) and consumer D-series (D7500, D5600, D3500, etc.) - No FTP support
Before You Begin
- Update your camera to the latest firmware from Nikon Download Center
- Start Simple FTP Tether on your Mac and click "Start Server"
- Note the IP address, username, and password from the FTP Settings tab
- Ensure camera and Mac are on the same Wi-Fi network
- For D-Series: Attach and power on wireless transmitter (WT-7/WT-6/WT-5)
General Setup Steps - Z-Series (Built-in Wi-Fi)
Step 1: Connect to Wi-Fi
Navigate to: MENU → Network → Connect to smart device
- Choose "Connect to existing network"
- Select your Wi-Fi network from the list
- Enter your Wi-Fi password
- Wait for "Connected" confirmation
Step 2: Create FTP Profile
Navigate to: MENU → Network → Network settings → FTP upload → FTP connection settings → Add new profile
- Profile name: SimpleFTPTether (or any name)
- Host address: Enter IP from Simple FTP Tether (e.g., 192.168.1.100)
- Port: 2121 (or port shown in Simple FTP Tether)
- User name: From Simple FTP Tether (case-sensitive)
- Password: From Simple FTP Tether (case-sensitive)
- Destination folder: / (root folder)
- Connection mode: Passive (CRITICAL!)
Step 3: Test Connection & Enable Auto Upload (Recommended)
- Select "Test connection" to verify settings
- Set "Upload file type" to JPEG (fastest) or NEF+JPEG (full backup)
- Enable "Auto upload" for automatic uploads after each shot
- Enable "Background upload" to continue shooting during transfer
General Setup Steps - D-Series (With Wireless Transmitter)
Step 1-2: Attach Transmitter & Configure Network
- Attach wireless transmitter to camera and power it on
- Navigate to:
Camera Menu → Network → Wireless transmitter - Create new network profile
Step 3-4: Set Up FTP & Test
- Host address: Your Mac's IP address
- Port: 2121
- User name/Password: From Simple FTP Tether
- Passive mode: On
- Save profile and test connection
⚠️ Important Notes:
- Always enable Passive Mode in camera settings
- For FTPS/SFTP cameras: Select "FTP" (not FTPS/SFTP) in camera settings
- Enabling Auto upload ensures images upload immediately after capture
- For D-Series: Use Nikon Wireless Transmitter Utility for easier setup
For detailed camera-specific instructions, click your camera model's manual link above.
💡 Tips for All Camera Brands
Essential Setup Recommendation
✅ Enable Auto Transfer in Your Camera
For the best experience, enable "Auto Transfer", "Auto Upload", or "Auto Send" (varies by brand) in your camera settings. This ensures images are automatically uploaded to Simple FTP Tether immediately after capture, creating a seamless tethered shooting workflow.
Connection Troubleshooting
- Verify IP Address: Ensure the IP in your camera matches what Simple FTP Tether displays
- Same Network: Camera and Mac must be on the same Wi-Fi network
- Passive Mode: Always enable PASV/Passive mode in camera settings
- Firewall: Check macOS firewall settings allow Simple FTP Tether
- Server Running: Ensure Simple FTP Tether shows "Server Running" (green status)
Transfer Speed Tips
- Use JPEG only for fastest transfer (RAW files are 5-10x larger)
- Connect to 5GHz Wi-Fi when available (faster than 2.4GHz)
- Move closer to your Wi-Fi router to improve signal strength
- Reduce image size/quality settings on camera for faster uploads
- Enable background/concurrent upload if your camera supports it
📖 Need More Help?
These are quick-start guides. For complete step-by-step instructions with screenshots, troubleshooting, and advanced features, refer to:
- Your camera's official user manual
- Manufacturer support websites:
- Canon: www.usa.canon.com/support
- Sony: www.sony.com/electronics/support
- Nikon: www.nikonusa.com
- Simple FTP Tether's in-app Help menu (includes full detailed guides)
⚠️ Common Issues
FTP Server Won't Start
- Check that the port is not already in use by another service
- Verify you have permission to access the selected directory
- Ensure both username and password are set
- Try using a different port number (e.g., 2121 or 8021)
Images Not Appearing
- Verify the FTP server is running (status indicator should be green)
- Check that the directory path is correct
- Ensure images are in supported formats (JPEG, PNG, TIFF, HEIF, RAW)
- Verify file permissions allow the app to read the images
- Try manually adding an image to the folder to test
Performance Issues
- Reduce grid item size for large image collections
- Close other applications to free up memory
- Check available disk space
- Consider archiving older images to reduce database size
Autocomplete Not Working
- Verify the text file format (one entry per line, no empty lines)
- Check file encoding (UTF-8 recommended, UTF-16 supported)
- Ensure file size is under 1MB (approximately 50,000 entries)
- Confirm you've imported the file through the app
- Avoid special characters or formatting - use plain text only
Connection Issues
- Ensure your camera/device and Mac are on the same network
- Check firewall settings aren't blocking the FTP port
- Verify the IP address hasn't changed (especially on WiFi)
- Test connection with an FTP client like FileZilla first
Trial or Purchase Issues
- Trial starts automatically on first launch
- Use "Restore Purchase" if you've purchased on this Apple ID
- Purchases are tied to your Apple ID, not the device
- Check App Store purchase history if restoration fails
Supported File Formats
- JPEG: .jpg, .jpeg
- PNG: .png
- TIFF: .tiff, .tif
- HEIF: .heic, .heif
- RAW: .cr2 (Canon), .nef (Nikon), .arw (Sony), .raf (Fujifilm), .dng (Adobe), .orf (Olympus), .rw2 (Panasonic), .pef (Pentax)